Aims of this page:
-To briefly detail how specimens are processed by the laboratory and how results are obtained and used
-To explain why a histology laboratory is necessary as part of the diagnostic pathway
Why Histology?
Histology is the study of tissues in their whole as they were inside the body; this differs from cytology which is the study of cells which are typically held in a suspension. In the laboratory tissues are stained, then studied using a microscope. Each of the different parts of the body have their own look to them (e.g. the lung looks very different from the liver); in the same way, different diseases (pathologies) also have their own look. If a pathology is suspected in a certain tissue, a sample/specimen may be taken and sent to a histology lab for analysis; this is how diagnoses can be made.
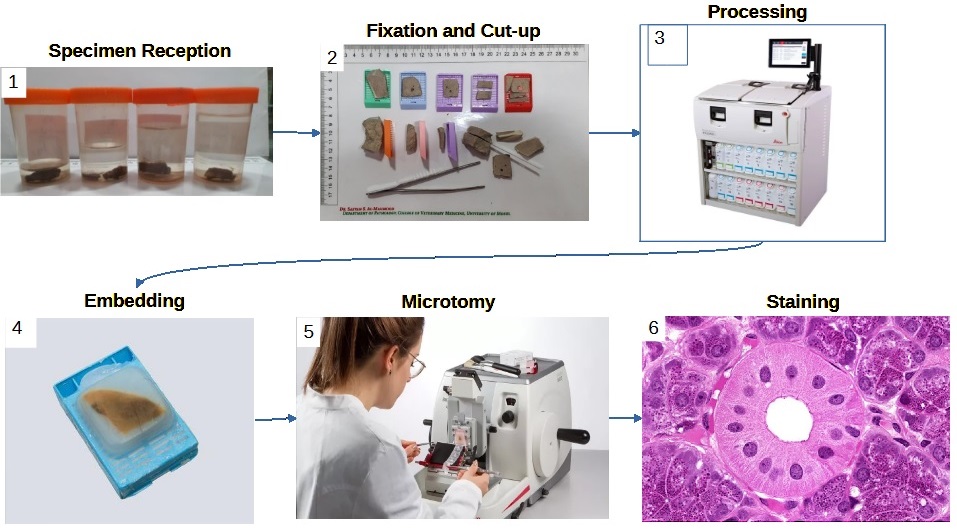
Sample Pathway
Note: this pathway is true for most histology specimens, however some specialties and some analytical techniques require different methods.
References:
Image 1 and 2. Al-Sabawy, H.B.; Rahawy, A.M.; Al-Mahmood, S.S. (2021) Standard Techniques for Formalin-Fixed Paraffin-Embedded Tissue: A Pathologist’s Perspective. Iraqi Journal of Veterinary Sciences. 35: 127-135
Image 3. https://www.leicabiosystems.com/en-gb/histology-equipment/tissue-processors/histocore-peloris-3/
Image 4. https://www.leicabiosystems.com/knowledge-pathway/an-introduction-to-specimen-processing/
Image 5. https://www.leicabiosystems.com/en-gb/histology-equipment/microtomes/histocore-biocut
Image 6. https://histologyguide.com/
1. Specimen Reception
The histology laboratory can receive a wide range of different samples (anything from a 1mm lung biopsy to a colon) and this means a wide range of sample pot sizes. Apart from a few special circumstances, specimens will also be received suspended in formalin (a preservative). Ideally there will be 10x the volume of formalin to the size of the specimen, and this can make for some very heavy specimen pots!
Samples can also come from a range of locations (e.g. surgical theatres, GP practices, specialist centres, other hospitals).
Every sample received must be accompanied by a histology request form detailing what the specimen is, why it was taken, and any relevant patient history.
What is received?:
• Specimen pot(s) containing the sample and labelled with patient details.
• Histology request form labelled with patient and specimen details.
What are patient details?:
• Full name
• Date of birth
• NHS number
• MRN (hospital number)
Note: different patient identifiers may be acceptable at different laboratories. Typically at least 3 identifiers are required.
It is not uncommon for multiple pots to be received with a single histology request form. This may happen if, for example, multiple samples were taken from a patient from different locations on their body; each sample taken would be placed in a separate pot labelled with the location so that it can be identified in the lab. Each separate pot must be identified on the histology request form.
Once a specimen has been received and accepted, it will be allocated a unique laboratory number and barcode and entered on the computer system.
Important notes for sending/ receiving samples:
Some laboratories specialise in certain tissues (e.g. neuropathology will specialise muscle and nerve pathologies, orthopaedics will specialise in bone pathologies) while others are more general. When sending or receiving specimens it is important to know which laboratory accepts which specimen to avoid delays. In some cases, delays could cause damage to the sample and impact the results.
When sending and receiving samples, ALWAYS check that there is the correct patient information on the specimen pot and the form, and that the details match! Samples SHOULD NOT be accepted if the patient or specimen can not be correctly identified as this could lead to results being sent to the wrong patient and/or a wrong diagnosis. Incorrect or missing information can lead to delays.
Specimen pots should be large enough to contain 10x the volume of formalin to the specimen. Anything less than this could impact the preservation of the sample and the results. Any specimen received in a pot that is too small should be transferred to a bigger pot (along with the patient details) and more formalin added, in accordance with local protocols.
If in any doubt about how to send a sample or where to send it to, please ask the lab! We’re not that scary and we’d rather you got it right!
2. Fixation and Cut-up
Fixation
Cut-up is the first main area of the lab, and, as the name suggests, is where specimens are ‘cut up’. Before specimens can be ‘cut up’ though, they must be ‘fixed’. Fixation is a method of preserving tissue and is important as it keeps the tissue in as life-like a state as possible and prevents it from decaying. If a tissue isn’t fixed properly and it does start to decay, it may impossible to tell whether the decay (necrosis) is due to pathology or poor fixation, or it may hide a pathology; both of these could lead to a misdiagnosis or no diagnosis being able to be made.
Neutral buffered formalin (NBF) is one of the most common fixatives used and works by binding proteins together. Most of the working parts of a cell are protein, so by NBF binding these proteins, the cell is held in biochemical stasis; unable to work, or decay. Fixation also has the added benefit of strengthening and protecting the tissue from later laboratory processes which would otherwise cause damage to the sample.
Fixation is a slow process, with NBF penetrating the tissue at a rate of 1mm per hour. To ensure proper fixation, samples are typically left to fix for a minimum of 24 hours. Smaller samples may be left to fix for less time, while larger specimens may have to fix for longer. Some large specimens may need to be sliced multiple times and packed with paper towels to speed up the fixation process, otherwise the inside may necrotise before the formalin reaches it.
Cut-Up
This is the first time in the laboratory process that samples are handled directly. The sample handling itself must be done on special ventilated benches (down-draft bench) which gently sucks the air away from the practitioner working at it. This is important as the samples being handled are covered in formalin, which readily evaporates and will cause harm to the practitioner.
The ‘cutting up’ of a specimen may also be referred to as ‘grossing’. The practitioner doing the cut-up will give description of the specimen throughout the cut-up process. This is referred to as the macroscopic description (as opposed to the microscopic description), and forms part of the patient record.
The process of ‘cutting up’ a specimen is:
1. Check that the details on the specimen pot(s) and histology request form match
2. Remove the sample from the pot and describe it. The description may include the dimensions, colour, and any other notable features of the specimen.
3. Some specimens may have areas of the outside of them painted/inked to highlight specific areas of the sample. A description of this is given.
4. If the specimen is large, samples will be cut from it. A description is given of the different samples and where they were taken from so that they can be identified later.
5. Each sample is placed into a cassette with a unique label. A description is given of what sample is placed into each cassette.
Any tissue sampled in cassettes is placed in NBF awaiting the next stage of the laboratory process.
Any tissue not sampled is placed back into the specimen pot with formalin and is stored for a set amount of time (typically 6 weeks) until it is disposed of by incineration.
Troubleshooting
If, at this stage the tissue is not fully fixed, it may be left in formalin overnight to be processed the following day. All tissue must be fully fixed before it leaves cut-up otherwise there will be irreversible damage done to the integrity of the unfixed tissue and a diagnosis may not be able to be made.
Some tissue may require a pre-treatment before it can be cut in cut-up, however it is vital that tissue is fully fixed before this pre-treatment otherwise tissue damage can occur. E.g. bone requires decalcification either with an acid (formic, nitric, hydrochloric) or a chelating agent (EDTA).
3. Processing
Once fixed, the tissue sample must be infused with paraffin wax; this gives the tissue support so that it can be thinly sliced and mounted onto microscope slides. Unfortunately, formalin is water-based therefore the wax won’t infuse into it and so the tissue must be exposed to a series of chemicals first.
Dehydration
The first step in tissue processing is the removal of the water-based formalin (dehydration). This is typically achieved with an ethanol series; soaking in a lower concentration of ethanol (e.g. 70%) followed by soaking in sequential batches of 100% ethanol.
Clearing
The next step is to remove the dehydration agent and replace it with a solvent that wax will dissolve in. This is commonly achieved with a series of xylene soaks.
Infiltration
This final stage is a series of soaks in paraffin wax until the clearing agent has been replaced.
Processing is a long process ranging from 4 hours for a small biopsy, to 24 hours for a megablock sample. A typical sample will process for between 13 and 15 hours, and so this is typically left to run overnight.
4. Embedding
Once processed, the tissue is safe to handle without gloves as any infectious agents would have been deactivated by fixation, and any harmful chemicals removed through processing.
Embedding is the process of orientating the tissue in preparation for microtomy (thinly slicing the tissue for microscopic analysis, also referred to as ‘sectioning’). The orientation of the tissue will depend on the sample, e.g. a tube should be placed on it’s end so that the full circumference of the tube will be sectioned. Typically, tissue is orientated so that all of the different layers of the tissue will be sectioned at microtomy.
Once the orientation of the sample has been decided, it will be orientated in a mould, the mould filled with wax, and the cassette placed on top. The mould is then placed on a cold plate to solidify the wax where it can then be removed from the mould. The block of solidified wax referred to as a ‘block’.
Note: The correct orientation of tissue at embedding is vital. A pathology may be missed, or cut through at microtomy if incorrectly orientated.
5. Microtomy
Microtomy is the thin slicing of embedded tissue. The purpose of this is to produce a section of tissue roughly one cell thick so that the shape, size, and position of the cells and nuclei within the tissue can be analysed, along with other tissue structures. The typical cell is roughly 3μm wide, and so sections are generally taken at a thickness of either 3 or 4μm, although this is dependent on the tissue and what stain the section will be stained with.
The typical microtome used is known as a rotary microtome. In one revolution of the handle of the microtome, the chuck is moved down over a blade, then back to it’s original position but advanced toward the blade by the set thickness.
The process of taking a section involves:
1. Clipping the block into the chuck
2. Trimming – repeatedly moving the chuck over a blade to trim off thick sections of excess wax until a full cross-section (full-face) of the tissue is revealed
3. Fine trimming – take 5-10 sections at standard thickness to ‘polish’ the surface
4. Sectioning – take a ribbon of sections. When consecutive sections are taken the ends tend to stick together allowing a ‘ribbon’ of sections to be obtained.
5. Float the ribbon of sections onto the surface of a warm water bath
6. Separate the desired section from the rest using forceps
7. Mount the desired section onto a microscope slide
Most samples only require a single section to be taken from them, but others require different protocols depending on what is required to make a diagnosis. A common protocol is to take a set number of levels (e.g. 4), here, a section would be taken, the block trimmed, then another section taken (2nd level), and repeated until the desired number of levels have been taken.
6. Staining
Once sections have been taken, it is very difficult to see the tissue structure microscopically (as the sections are so thin, they are translucent and mostly colourless), and so they must be stained so that the relevant parts of the cells can be observed.
Before staining can occur the slides must be pre-treated. Firstly, the sections must be heated so that the wax melts onto the slide, otherwise when the slides are exposed to the staining solutions the sections will float off of the slide and away. Secondly, the stains are water-based but the section is infused with wax which repels water, and so the wax must be removed before staining can begin. This is achieved by dissolving the wax in xylene, dehydrating in ethanol, then re-hydrating in water.
Once slides have been stained, the sections must be protected and prevented from drying out, and this achieved by mounting a coverslip. The mountant used is commonly resin-based and dissolves in xylene, and so the slides must be dehydrated in ethanol and cleared in xylene before coverslipping.
H&E
The haematoxylin and eosin (H&E) stain is the most common stain used in the histology laboratory, with every block having at least one section stained. In this stain, the haematoxylin is used to stain the nuclei blue, while the eosin stains other structures various shades of pink. This stain allows the general structure of the tissue to be observed, along with the shape, size, and distribution of cells and nuclei within the tissue.
For many cases, the H&E is the only stain that is required. For others, it can be used to suggest a working diagnosis and suggest other stains that might be useful.
The general H&E procedure:
1. Over-stain with haematoxylin
2. Differentiation – remove haematoxylin using 1% acid-alcohol until there is only haematoxylin staining remaining in the nuclei
3. Blueing – wash slide in tap water until the nuclei turn from purple to blue
4. Stain with eosin
Special Stains
The special stains are those that stain to demonstrate specific structures or features within the tissue. Certain special stains are routinely done for certain sample types, but specific stains can also be requested after the H&E has been examined. Due to the chemistry of the stains, some techniques can have multiple uses, e.g. periodic acid Schiff (PAS) can be used for staining glycogen, mucins, and fungi.
Most special stains can be undertaken on standard tissue sections, dewaxed in the standard way, however some stains can not and so it is important to be sure of the protocol before starting any stain. For example, tissue to be stained with Wade Fite must be dewaxed in a mixture of 50% peanut oil and xylene rather than 100% xylene to ensure staining of the target mycobacterium.
The length of time it takes to do a special stain depends entirely on the stain with some (e.g. Gram) only taking a few minutes, while others (e.g. Masson-Fontana) taking up to 24 hours. The majority of stains can normally be completed in less than 1-2 hours.
Examples of special stains:
| What is Being Stained | Name of Stain | Specific Staining |
| Microorganisms | Gram | Gram positive and negative bacteria |
| Grocott | Fungi | |
| Zeil Nielson | Mycobacterium (tuberculosis) | |
| Wade Fite | Mycobacterium (leprosy) | |
| Toludine Blue | Helicobacter pylori | |
| Pigments | Perls Prussian Blue | Iron deposits |
| Masson-Fontana | Melanin | |
| Fouchet | Bile pigment | |
| Fat | Oil Red O | Lipids and fatty acids |
| Connective tissue | Massons Trichrome | Collagen, muscle, nuclei |
| Elastin Van Gieson | Elastin | |
| Reticulin | Reticulin (collagen III) | |
| Fast Green – Sirius Red | Collagen | |
| Carbohydrates | Periodic Acid Schiff (PAS) | Mucins, glycogen |
| Diastase PAS (DPAS) | Mucins | |
| Alcian blue | Mucopolysaccharides, acid mucins |
Immunohistochemical Staining
Unlike the other stains which target particular structures within the tissue, immuno staining targets specific protein or genetic sequences. Techniques used include immunohistochemistry (IHC), immunofluorescence (IMF) and in situ hybrisisation (ISH) techniques. IHC and IMF use antibodies to target specific proteins within the tissue, while ISH use probes (short nucleotide sequences) to target specific DNA or RNA sequences. A coloured or fluorescent compound is then used to demonstrate where the antibody or probe has bound to the tissue.
The results of an immuno stain is based on the staining intensity and is typically labelled as either positive (staining) or negative (little to no staining). In some specific cases the staining may be labelled as ‘borderline’, and then further tests will be done.
Immuno staining is only done routinely on a few specific specimens, in the majority of cases it is requested after analysing the H&E. It is commonly used to form part of a cancer diagnosis where the staining profile (which stains are positive and which are negative) can suggest a specific cancer. Immuno staining can also be used to help clinicians decide on cancer treatments (e.g. a breast cancer that is HER2 positive should respond well to a chemotherapy targeting HER2, such as Trastuzumab (Herceptin)).
There are a vast number of immuno stains available but they are very expensive and have a relatively short shelf life and so each laboratory will only stock a certain number that they routinely require. It is not uncommon for cases to be referred to different laboratories that stock the specific stains required. Referring cases outside of the laboratory increases the delay in getting results as specimens have to be physically transported to the referred laboratory.
Immuno staining is not fast: IMF typically takes about 1 hour; IHC roughly 4 hours; ISH roughly 6 hours. This increases the length of time taken to reach a diagnosis, particularly if multiple rounds of immuno staining is required.
Note: Due to the sensitive nature of the staining targets, only fresh sections should be used otherwise a section may appear to stain negatively when it is actually positive (false negative). Care also needs to be taken with tissue preservation; it is not uncommon to have 10+ immuno stains requested on very small pieces of tissue and it would be very to cut through this sample and have none left to do further stains on.
7. Reporting
Once slides have been stained they are sent to the reporting pathologist where they are examined microscopically and a description is given of what is seen (microscopic description), which will form part of the patient record. Each slide will have a microscopic description of the tissue type, stain, and any interesting or abnormal features.
If the pathologist can’t see what they need to make a diagnosis using the slides they have they may request further stains (e.g. more levels of H&E staining, special stains, immuno staining). Or the pathologist may need to take more samples from the remaining tissue in cut-up. In some cases, tissue may need to be referred to other laboratories for further testing e.g. genetic testing.
Once a pathologist has made a diagnosis they will record this in the patient record and authorise the report, where it can then be sent to the clinician that ordered the histology. The pathologist will also discuss their cases in regular multidisciplinary team (MDT) meetings with other clinicians involved in making decisions about the patient’s care (e.g. surgeons, nurses, radiologists). In these meetings, relevant developments of the case the different specialists will discuss their findings and come to a consensus on the best way to further treat the patient, taking into consideration the desires of the patient. The patient can then make a decision on their treatment with the treating clinician based on the options discussed in the MDT.
